
Golf Ferrules Explained: Fit, Finish, and Custom Club Style
Learn what golf ferrules do, how they are fitted and finished, when a separated ferrule is cosmetic, and how custom ferrules change a club’s look.
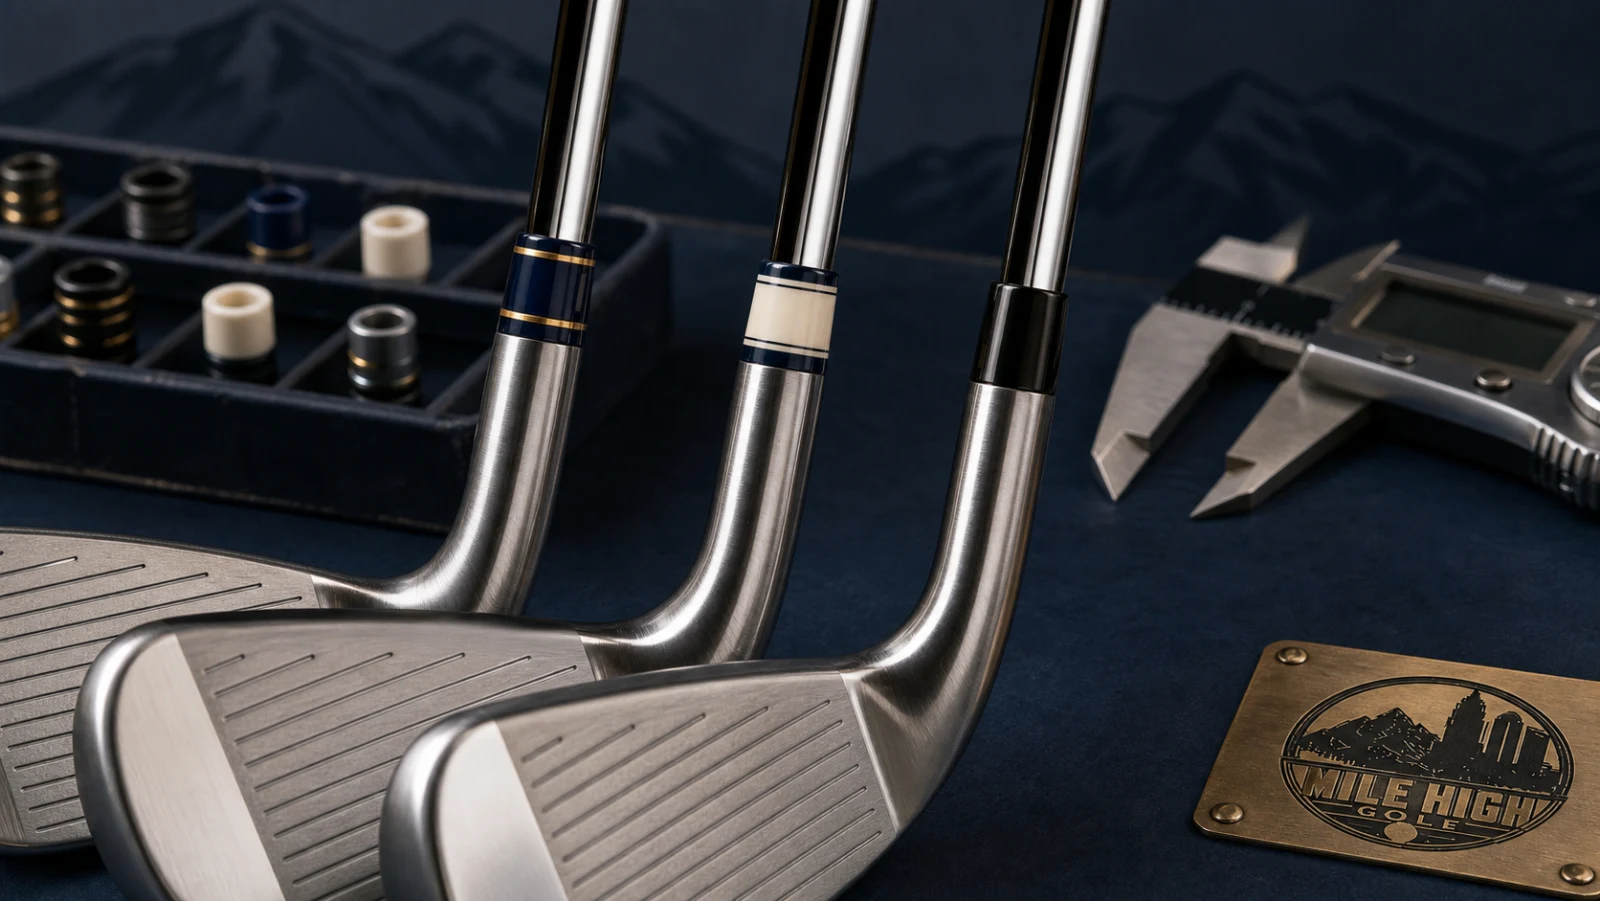
The ferrule is the small sleeve at the transition between a golf club’s shaft and hosel. On many irons and wedges, it is only a fraction of an inch long. Yet a poorly fitted ferrule can make an otherwise excellent build look unfinished, while a carefully selected custom ferrule can give a set a distinctive identity without overwhelming the clubhead.
Ferrules are often described as purely cosmetic. That is broadly true for many conventional iron assemblies, but it is incomplete. The correct ferrule also covers the visible joint, creates a clean transition, and—on designs that require one—can include a collar matched to a recessed hosel. The component must fit the shaft and clubhead, survive installation, and finish flush without damaging the shaft.
This guide explains how ferrules are specified, installed, turned, polished, customized, and diagnosed when something begins to move.
Anatomy of the shaft-to-hosel transition
The hosel is the portion of the clubhead that receives the shaft. The shaft tip is prepared and bonded into the hosel with an appropriate adhesive system. The ferrule sits at the top edge of that joint on designs that use one.
A conventional ferrule typically does three visible jobs:
- covers the junction and any small gap at the hosel entrance;
- creates a smooth visual transition from shaft diameter to hosel diameter;
- gives the builder a finishable surface that can be turned and polished flush.
Ferrule manufacturer BB&F Co. describes the component as the transition between shaft and hosel, covering the bonded area and providing a professional appearance. Its ferrule FAQ also illustrates the variety of plastics, metals, colors, and constructions now available.
The ferrule does not replace the structural bond. The properly prepared shaft tip, hosel, adhesive, insertion depth, and cure are what retain the clubhead. A decorative sleeve should never be treated as a repair for a loose head.
Ferrule dimensions have to match the build
Choosing by color alone is an easy way to create extra work. Three dimensions matter.
Inside diameter
The inside diameter must suit the shaft tip. Common iron shafts may be parallel tip or taper tip, and outside dimensions can differ. A ferrule that is much too tight may split, deform, or damage a finish during installation. One that is too loose may not center correctly or may require an unsuitable amount of adhesive to fill the gap.
Outside diameter
The ferrule’s outside diameter should be slightly larger than, or appropriately matched to, the top of the hosel so it can be finished into a continuous line. Too small leaves a visible step that cannot be turned away. Excessively large requires more material removal and raises the chance of uneven finishing.
Length and profile
Short ferrules create a restrained factory look. Longer ferrules create more visual presence and more room for rings, patterns, or color blocking. The intended clubhead design, available straight shaft section, and proportions of the set should guide the choice.
Measurements should be taken from the actual shaft and head, not assumed from a model description. Previous repairs, paint, plating, hosel preparation, and production tolerances can change the working fit.
Standard, collared, and specialty ferrules
Standard ferrules
A standard ferrule is a simple sleeve that meets the top of a conventional hosel. Many iron and wedge builds use this type.
Collared ferrules
A collared ferrule has a smaller extension that enters a counterbore or recess at the top of a compatible hosel. GolfWorks describes premium collared ferrules as suited to deeply countersunk hosels, with the collar helping cushion contact at the transition. The important word is compatible: the collar’s diameter and depth must match the hosel design. A collared ferrule should not be forced into a head that was not made for it.
OEM-specific and specialty designs
Some heads, adapters, utility clubs, and bore configurations use proprietary or unusual ferrule shapes. Replacing them with a generic sleeve can leave the wrong step, depth, or profile. When the original component is special, match the geometry before selecting the color.
Metal and 3D-printed ferrules
Aluminum, titanium, and printed ferrules expand the design range, but their machining, heat response, brittleness, finish, and installation behavior differ from ordinary plastic. The builder must confirm that the material can be installed and finished without creating an unsuitable edge or damaging the shaft.
Why graphite shafts require special care
Graphite shafts are engineered composites. Abrading through the outer finish and into structural fibers can weaken the tip or create a stress concentration. A ferrule should be sized and prepared so that installation and finishing do not require careless cutting against the shaft.
GolfWorks’ ferrule-turning instructions specifically warn against abrading graphite fibers. That warning applies at several stages:
- removing an old ferrule;
- preparing the shaft tip;
- fitting a tight new ferrule;
- turning the new ferrule flush;
- cleaning cured adhesive at the joint.
Heat also deserves restraint. Excess heat used during disassembly can damage graphite or nearby finishes. The extraction method should match the shaft and clubhead, with controlled force and temperature.
How a ferrule is installed and finished
A professional-looking result comes from preparation and alignment more than polishing.
1. Inspect and measure
Check whether the head is secure, whether the shaft is damaged, and whether the existing assembly uses a collar or special geometry. Measure shaft and hosel diameters. Record club length, orientation, and any shaft graphics that must align with the build plan.
2. Dry-fit the components
The ferrule should travel onto the shaft without splitting and should seat at the intended position. The shaft must still achieve the correct insertion depth in the hosel. A dry fit catches mismatches before adhesive is mixed.
3. Prepare the bond surfaces
Old adhesive, paint, oils, and debris can compromise a build. The shaft tip and hosel are prepared with methods appropriate to their materials. Preparation should create a clean bonding surface without removing unnecessary material.
4. Bond and seat
The correct adhesive is mixed accurately and applied to the prepared surfaces. The ferrule is seated against the hosel as the shaft reaches full insertion depth. Alignment is checked before cure. Parts should not be disturbed until the adhesive system has completed its specified cure.
5. Turn the ferrule
“Turning” means carefully reducing the ferrule’s outside surface so it flows flush into the hosel. Belt systems, purpose-built turning tools, or hand methods can be used. GolfWorks’ ferrule and shaft-prepping tool illustrates the separate operations: the shaft tip is prepared for bonding, while the ferrule is sized and finished to a smooth profile.
The goal is a continuous taper with no ledge, flat spot, melted edge, exposed shaft fiber, or scratched hosel.
6. Polish and inspect
The ferrule is brought to the intended sheen and the joint is cleaned. The builder checks for gaps, adhesive residue, alignment, surface damage, and consistent proportions throughout the set.
Custom ferrules: design with the entire club in mind
Custom ferrules can be subtle or expressive. A narrow navy-and-gold ring can echo a headcover or bag without dominating the club. A multi-color pattern can turn a rebuilt iron set into a personal collection. The most durable design decision is usually the one that works with the club’s existing materials.
Consider:
- the clubhead finish: chrome, satin, raw, black, or plated;
- shaft color and graphics;
- paint fill in the clubhead;
- grip color and texture;
- whether all clubs match or wedges receive a separate treatment;
- how the color will look after turning and polishing;
- future replacement availability.
Customization is strongest when there is a repeatable rule. For example: one base color across the set, a narrow accent tied to loft groups, and the same finished ferrule length on every iron. A proof board or physical samples help because screen colors and polished materials can differ.
Is a separated ferrule dangerous?
A visible gap between ferrule and hosel can have more than one cause.
Sometimes the ferrule has moved slightly up the shaft because of temperature cycles, incomplete seating, or differences in thermal expansion. If the clubhead is fully secure and there are no other symptoms, the issue may be cosmetic.
But a gap should not be diagnosed by appearance alone. Stop using the club and have it inspected if any of these are present:
- the head twists relative to the grip or shaft graphics;
- the head clicks, rattles, or moves when handled;
- the gap changes under light pressure;
- the shaft shows cracking, splintering, or a raised edge;
- adhesive debris appears around a widening joint;
- impact suddenly feels or sounds different.
Those signs can indicate a bond or shaft problem rather than a wandering ferrule. Pushing the ferrule down or adding household glue can hide evidence without repairing the assembly.
When replacement requires a rebuild
In many traditional bonded club assemblies, a ferrule is trapped between the shaft and hosel. Replacing it correctly usually means removing the head, cleaning and inspecting the components, installing the new ferrule, and reassembling the club. Cutting away the old ferrule and using a split cosmetic replacement may be possible in limited circumstances, but it is not equivalent to inspecting and rebuilding the joint.
That is why a “small plastic part” can require real clubmaking labor. The visible ferrule is inexpensive; controlled disassembly, surface preparation, alignment, adhesive work, cure time, turning, and finishing create the result.
Do ferrules affect performance?
For a typical, properly assembled iron, changing from one conventional plastic ferrule to another of similar size is primarily an aesthetic change. Golfers should be cautious about claims that a decorative ferrule alone creates meaningful speed, launch, spin, or consistency.
The build quality around it does matter. Correct shaft insertion, secure bonding, protected components, clean alignment, and appropriate cure are essential. A specialized collared ferrule may also be part of the head’s intended transition geometry. Those are assembly considerations, not magic performance properties.
Equipment-rule considerations
The Rules of Golf require club components to be fixed and regulate clubhead and neck form. The USGA’s shaft and neck interpretations allow small decorative features in appropriate circumstances but reject features used to circumvent dimensional or shape requirements.
Conventional, properly installed ferrules are routine. An oversized, movable, adjustable, or functionally shaped addition deserves closer review if the club will be used in competition. As with other custom work, decorative intent does not override equipment specifications.
Questions to settle before customizing a set
- Does the club use a standard, collared, or proprietary ferrule?
- What are the measured shaft-tip and hosel outside diameters?
- Is the shaft steel, graphite, or another composite?
- Is the head already loose, or is the visible issue cosmetic?
- Should the new ferrule reproduce an original look or create a new design?
- Will every club use the same pattern and finished length?
- Are grip, paint-fill, and shaft changes being coordinated at the same time?
- Does the customer understand that a correct replacement may require head removal and rebonding?
Answering those questions turns decoration into a controlled build specification.
Small component, finished-club impact
A ferrule does not need to be loud to matter. The right size makes the shaft-to-hosel line look deliberate. Careful turning makes the transition disappear under the fingers and the eye. A considered color pattern can make an ordinary set unmistakably personal.
Mile High Golf is building a specialty club-service shop in Denver, North Carolina, for golfers around Lake Norman. Custom ferrule and club-customization intake will open with the shop. For now, golfers can join the founding list for opening updates and review the planned Golf Pro Shop services.